
Retro Digital 🎮
@RetroDigitalLLC
Followers
2K
Following
15K
Media
681
Statuses
2K
Official Twitter/X? account for Retro Digital LLC. Video game console mods, restoration, upgrades, and repairs!
Florida, USA
Joined July 2021
I made the Xbox Microsoft didn't! Introducing the Limited Edition Mountain Dew Code Red Xbox. This v1.6 now has 128MB RAM, XboxHD+, pink Open Xenium, 2TB SSD with Xbox Origins build, 80-wire IDE, startech SATA IDE adapter, and matching red 3D printed parts. 🧵 1/5
28
120
1K
Last but not least, a few screenshots were taken in 1080p using all default settings. - Castlevania - Symphony of the Night - Driver 2 - Crash Bandicoot 2 - Tekken 3 🧵 5/5
0
0
11
Next up was the Retro GEM from PixelFX. Serial port removed to make room for the Retro GEM board. Then, the audio, controller, and main flex cables were installed. These connect to an intermediate board (not pictured), which then connects to the Retro GEM. 🧵 4/5
2
0
11
With the recap done, it was on to the next portion of the build. When doing a PS1 with xStation/GEM combo, I start with the xStation. The flex cables for the GEM are more delicate than a QSB and would just be flapping around everywhere while I am trying to work 😅 🧵 3/5
1
0
8
The first order of business was the recap. All electrolytic capacitors were removed, old solder cleaned up, and fresh new caps from console5 added. Once that was out of the way, it was time to move on to the fun stuff 🤓 🧵 2/5
1
0
8
Happy Friday, everyone! I just finished up this beautiful PlayStation console with xStation ODE, Laser Bear SD extension, and PixelFX Retro GEM HDMI output. This one also received a retrobright treatment, cleaning, and a complete recap. Check it out 👇 🧵 1/5
6
5
105
Last up, we have a few pics of the recap. This includes the motherboard (without disturbing the heatsync) and the optical drive board, as the power supply units in these consoles utilize polymer capacitors. 🧵 3/3
1
1
9
Next up, we have the Retro G.E.M. installation, including the mounting bracket and main flex connections. The old CR2032 was also removed and upgraded with a socket for easier swapping in the future. 🧵 2/3
1
1
8
Happy Friday, everyone! Check out this Hanshin Tigers 2003 Limited Edition Nintendo Gamecube upgraded with a @PixelFXco GC Retro G.E.M. Shiny, fresh caps, and a new (socketed) CR2032 battery. Up to 1440p output via full-size HDMI port! 🧵 1/3
4
2
37
Last but not least, a few screen captures from the RetroTink 4K, using a double shielded SCART cable from @MisirajEduart! - Mario Tennis - Bio F.R.E.A.K.S. - Hydro Thunder - Killer Instinct 🧵 4/4
0
1
11
On to the preventative maintenance portion of this thread. NUS-CPU-08 motherboard and LSEP power supply cleaned and recapped. 🧵 3/4
1
0
11
Next up, a few more pics of the N64RGB v4 installation, including the multiout breakout QSB, fine pitch MAV-NUS adapter flex, and board to board connectors. 🧵 2/4
1
0
10
N64RGB v4 from Tim Worthington ( https://t.co/iWF3T2CpAL) installed in a beautiful Jungle Green Nintendo 64 console. Crispy RGB video output, deblur, and in-game reset functions via button combinations! 🧵 1/4
4
9
102
For Sale ~ $700 Loopy USB-C capture card installed in a really nice red New Nintendo 3DS XL/LL console. Custom firmware up to date and region swapped from Japan to US. Includes USB-C data/charge cable and 256GB SD card. Comment or DM if interested.
10
10
118
Last but not least, some pics of the recap. Lots of capacitors.. Motherboard, power supply, and drive board all recapped and took the opportunity to replace the thernal compound on the CPU/GPU. 🧵 5/5
4
2
46
The DVD drive in this console was working fine, but some routine maintenance can't hurt. Drive cleaned, recapped, and relubricated. Also replaced the drive band for smooth drive tray open/close. 🧵 4/5
2
2
42
Moving on to the XboxHD+ installation. Being that this is a v1.6 board, an LPC rebuild was required. AV port removed, XboxHD+ flex installed along with associated wiring. Also added an MCPX heatsync because why not. 🧵 3/5
1
2
43
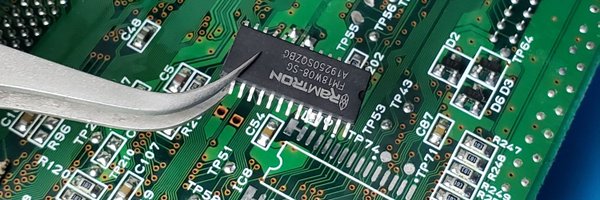
The most difficult part of this one was, of course, the RAM upgrade. v1.6 requires "stacking" the additional RAM chips on top of the existing RAM. Then, running a wire from pin28 of the new RAM for chip-select. 🧵 2/5
1
2
54
With everything done, we now have a completely restored SNES console that outputs absolutely beautiful RGB video, with switchless region SuperCIC and IGR from the controller! Oh, and check out these screenshots using a shielded SCART cable from @MisirajEduart! 🧵 5/5
0
1
19
Then it was on to the SuperCIC/uIGR. Original CIC chip removed and area cleaned. For the bi-color power LED I used a micro jst connector so the console can be properly disassembled if needed without having to unsolder the LED connections. 🧵 4/5
1
1
10